Big Game Project – Production Week 1

Source Control

Starting this new project up we needed to have a way to distribute the project between all the group members. The way we decided to handle the source control landed on using SVN.

The idea of source control is to enable multiple persons to work on the same project without risking to overwrite work created from the other members. The first attempt to get a working source control was with the use of Git. Git is a well known source control for code and documents. When it came to working with Git in unreal it was still under the Beta stage of development but it could still be operated.

Using git we ran into the problem where the repositories that were available had limits on repository sizes. It didn’t take long until we hit the 2 GB cap for the repository and were forced to migrate our source control into something more stable.

The new solution became the use of Subversion, also known as SVN. SVN has integrated with unity and many of the tasks needed of a source control was within reach from inside the engine itself.SVN

In order to get a working SVN without risk for hitting any form of restriction I setup a local SVN server on the local network. The SVN server worked flawless for me and for the rest of the group at first, then the problem of losing connectivity came up and we were forced to upgrade the local network with a router of our own that we had full control and could let the server through without firewalls interrupting.

The way SVN was integrated in Unreal made it so that you check out the files you are working with, by doing so others get prompted that these files are locked by the other member. This prevents files from being overwritten. Locked


Having the SVN server on a local machine also came with the bonus of incredible sync speed compared to the earlier Git Source Control we were using.

Tagged with: ,
Posted in Uncategorized

Weekly Programming III Post 1

This week was the first week of the course Programming III.

To start off this new course we were handed out an assignment to compress a BMP file as much as possible, then restore it to the original BMP file that it was from the beginning. The first thought of this was how do you even?….

Doing this assignnment in a group of 3 persons helped. There was some backseat programming as it was hard to split out the work of one assignment that no one in the group how it was goin to be made. We did however discuss in group of How we should do it in theory and how to compress it even further.image

The bmp file looked like this and was originally 193 kB, we managed to compress it down to 4 kb but did not save that build as we thought we could go further, resulting in corrupting that build and getting it back to our previous 7 kb. This was achieved by bundling each sort of pixel color in a row together in a block that would later be reverted back in the decompressor. We did not manage to get the decompressor working though.

After we had this assignment i started to talk about it with a norwegian friend of mine that also does programming. He decided it was a fun assignment, and he could do it better. Towards the end of the week he had managed to compress it down to 22 bytes. By using search algoritms for each rectangle and doing it over and over trying to link rectangles together. having the picture ending out in 5 rectangles. each having x, y, height, width, color.

At this moment i only have the code for the Decompressor and the compressed file. But what is even more fun with the Decompressor is that it can turn any file into a bmp picture by just dropping that file on the Decompressor exe file. It will not read the whole file, just up to the max cap. This results in funny pictures such as these.


out out out

Tagged with:
Posted in Programming

Portobello Market

This week my group played the game Portobello Market. The goal of the game is to achieve and maintain the highest score when the game ends.

In order to get score you get to place down market stands along the roads that goes between the eleven squares. Next to the road where you place down your markets there are numbers indicated how much score you will receive when the road has been completed.


Just having the road filled with market stands alone is not going to provide any score. In order to earn money from your market you will also need to place visitors down on the board. The visitors come in three different kinds. There is the ordinary visitor (gray), the noble visitor (pink) and the last square of the game will receive the ruler (black) providing the most scores to adjacent roads. The different kind of visitors acted as multipliers depending on what combination of them on each side of the road. With the different combination it’s possible to get anything from the regular 1x up to the 3x. The last visitor that is being placed, the ruler, is special and can provide either 3x or 4x multiplier, depending on if there is a noble or regular visitor in the other end of the road.

There’s also an alternative way for players to get score, it can be done by using the one of the two action markers that can also serve as a district marker. However before going into that I should first mention that the first move you get to do on your turn is selecting which of your action markers you would want to use. You start with a setup of 2,3 and 4 action markers, the 2 action marker gives you two action points 3 gives you three etc. With each of these action points you get to either place a market stand or a visitor. When selecting the action marker it becomes marked as used by being flipped, once all three have been flipped they are then on your next turn all flipped back and ready to be used again. The two and four action markers also have a secondary use as they can be placed out on the game board as district markers. The two district markers will then act as a multiplier for the district. Looking at the map a district will have three roads connected to it, and it will only give score to the player who played the district marker for his own market stands. However once you have placed one of your action markers as a district marker it will remain grounded on that district and you will not be able to use it again. instead you will receive a replacement marker from the neutral pile of action markers. These neutral markers ranges from 3 to 1 action points, placed in an order so the highest one available is always at the top. This being said you could upgrade your 2 action marker into a 3 action marker. But later on it could also turn out that the 4 action marker gets turned into a 1 action marker. It’s all depending on how the players chooses to play.

However just having the game like this would be to simple, if you got to place your market stands wherever you want. So this is where the next part of the mechanic comes in. The Bobby.

The Bobby gives the players ways to control the game, the bobby is placed on districts and may only move from one district to the next by crossing over roads. When crossing roads the player might need to pay for that action depending on the status of the road. If the player has the majority of the market places on the road the player may do so for free. If the road has no markets the player must pay one score for the movement action. If another player has the majority of the market places the acting player will need to pay one score to the player that maintains the majority. If the majority is split between two players, the fee for crossing will be one score to each of the players controlling the road.

So if it only cost you score as you move the bobby, why would you want to do it?
That is because the other properties of the bobby. Market stands may only be placed around the district where the bobby is located. And as theres no limit to how you may move the bobby during your turn, you can retreat with it into your territory and make others get no choice but to give you points for moving the bobby out. This strategy works better when only playing two players as the turns become longer the more players you are and it grows harder to gain a territory that you can keep majority on the roads to.

The action of moving the bobby does not count as using an action point, and may be done whenever and freely during the active players turns, as long as he follows the rules of paying when crossing over other roads

So what was so good about Portobello market? I would say that it was how easy the game was at first, but then the more you played it. The more it became obvious that there were so many different ways of playing it. As you get to select from either two, three or four action point to use at first. You can either get an early advantage or push at as many roads as you want. If you play your lower action points at first, later on when the other players only have their two action point move left, you could go forth with a dashing four action point move. When doing this on the third turn, you could also on your forth turn use the four action point again. When I tried playing this I realized it’s not only how you place the markers on the board, it’s a combination of how you use the action points with when you decide to use them. How you decide to place the markers on the board also has a big impact as well. I simply like that it’s so free formed and you get to make decisions on how you want to play your turn.

The game just simply evolves the more you experiment with different play styles!

And what was it that wasn’t that good about Portobello Market?

The way the game is changing depending on the number of players could have been better; the game plays so differently when played on two players compared to four. I’m not saying that it’s all a bad thing just that it could have been made more interesting. As the game plays now, when the game ends there are still multiple free places on roads available. I think that forcing the players to use all of the available roads would be more interesting.

While playing the game i got a feeling that being the starting player was at a disadvantage. As the game lets the round finish after the first player runs out of market stands. This can be used quite much by the last player of the turn as if he decides to use up all of his remaining market stands there is none left after him and the game would end instantaneous. But the first player of the turn would have to anticipate every move all the players could use. While I see this as a bad point, I cant figure out a simple mechanic to work around it, having a “new” turn go around would allow other players to get a higher total amount of turns and would be unfair as well.

I also think that changing the amount it costs to cross the roads should be raised. The one score you can get by having another player going over a road you have control over just ain’t gonna cut it when the move he makes after passing the road is gonna be two digits.

With the recommended age of eight years, I can clearly say that I agree with this recommendation. The actuall game mechanics are simple at first but advanced tactics can be worked through by playing the game more than once. The one thing that i think could be just a little bit tricky for players at the minimum age is the score calculation. As there are multipliers and multiple roads that could be in need of being calculated at the same time. In the end i would say that I agree with the recommendation age but I would also say that with that there should be an older person nearby that could help with the rules.

And to sum up the entire analysis of Portobello Market I would first say that I enjoyed playing this game. The strategic elements and the possibilities to try new strategies every time. Especially as you will always need to modify your strategy depending on what your opponents does. This creates the possibility of so many different outcomes of the game. The game is easy to learn and you wouldn’t even need the rule book if you had one player who knew the rules playing with you.

Once the game is over the game board can feel empty, as we didn’t try to play with changed rules to fill the board I can’t know for sure that it would make any good change. However I do like to belive that by forcing the players to use up all of the empty market stands on the boards, there would be multiple times where players would be forced to walk across roads where other players have a majority of the markets.

Tagged with:
Posted in Board Game

Drakborgen

This week the task to analyse a Board game of our choice was given. The task was to analyze the core system and the components to get a better understanding of game systems.

The group I’m in ended up with picking the game Drakborgen also known as DungeonQuest. The version we played was not the original from 1985, but the remake from 2002. This game is all about finding the most valuable loot while still making it out alive. This is done by exploring rooms, when entering a new room you can find anything from valuable loot to items or monsters.


Good Sides

The best parts of this game was that every time we played it turned out different than the previous times we played.

The Dragon Room had an interesting mechanic that made it motivating to stay even though the chance to wake the dragon were against you, it really shows how easy it is to be greedy and not get out in time. (Dragon Awakes)

Multiple ways to win, Having the most loot does you no good if you end up dying, sometimes its better to just stay in the shadows exploring the dungeon instead of raiding the Dragon Room.

Bad Sides

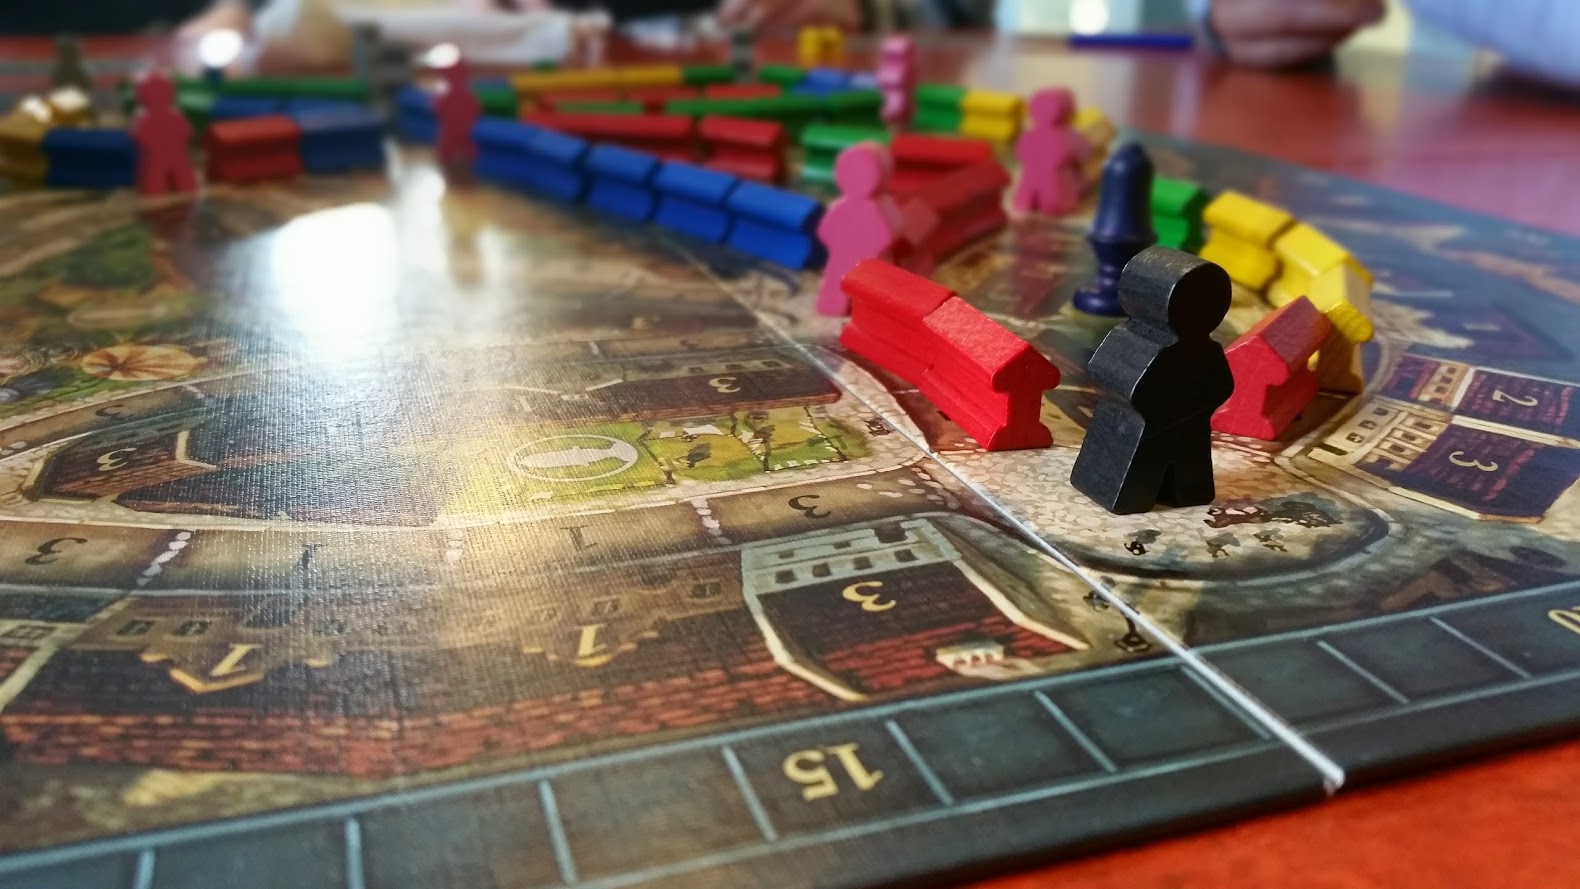
Tile Placements. While not having a direct effect on the game itself it did affect the gameplay. The square formed room cards that were supposed to be flipped on the board when entering rooms turned out to be annoying, especially when there’s supposed to be a stack of two cards on each tile. It was also hard to pickup and turn these without moving the rest of the nearby tiles around.

The combat system could have been better, It’s a stat based combat system that relies on mind games against your opponent in a rock paper scissors like style. What makes this count as a bad part is that theres no reward to combat, you wont gain anything out of it, unless you draw a special kind of monster that turns into a stat modifier.

The game has optional rules that allows for PvP fights, but there’s no encouragement for going into battle with other players. Just like the normal monster fights, there is no rewards for winning in combat. However, you could win the game on PvP by making sure that you are the last one standing and then getting out of the dungeon.

Another bad side is the amount of optional rules, these rules would need to be determined with the players before starting, including not only PvP but also the “Advanced rules”.  In my opinion the Advanced rules aren’t really advanced and they make more sense, as the game goes from each player having their own turn, into all players gets to decide their moves at the same time.

Core Game

Lets start by going into the different cards and pieces of the game.

– Labyrinth tiles
Every time you enter a unexplored room you flip the Labyrinth tile. This will contain the layout of the room leaving the small dot on the tile as your point of entry. If you get a room tile with a red dot you also get to draw a Room tile. (also flip)

– Room tiles
The room tiles are the cards with the greatest varieties of what it could contain, all from Traps, Monsters, valuables or equipment are found on these cards. They are only found the first time upon entering a room. These cards also include door, hidden passages, corridors and fences.

– Ring Cards
These cards contains a special power for your character, some of them can only be triggerd in special situations while others are passive and active all the time, the stronger ring cards are consumables and may only be used once during the game.

– Treasure Cards
Upon entering the Dragon room you get to draw a treasure each turn, by doing so you also have to draw a Dragon card.

– Dragon Cards
The Dragon card contains just one “The Dragon Awakes” card, while the rest are “The Dragon is asleep”, For every turn that players try to loot the Dragon room there number of Dragon cards decreases and the chance to wake up the dragon increases. The Dragon Card pile can however be reset if all the players leave the Dragon Room at the same time.

– Monster Cards
If a monster is drawn on one of the room tiles a monster card gets drawn. Depending on what the player decides to do, the monster will act differently. how the monster will react is written on the monster card, the card also contains the amount of health the monster has.

– Dices
The game uses two different dices, one of them is a regular t12 and the other one is a so called sun dice.  The sun dice is used to determine the outcome of different events.

– Characters
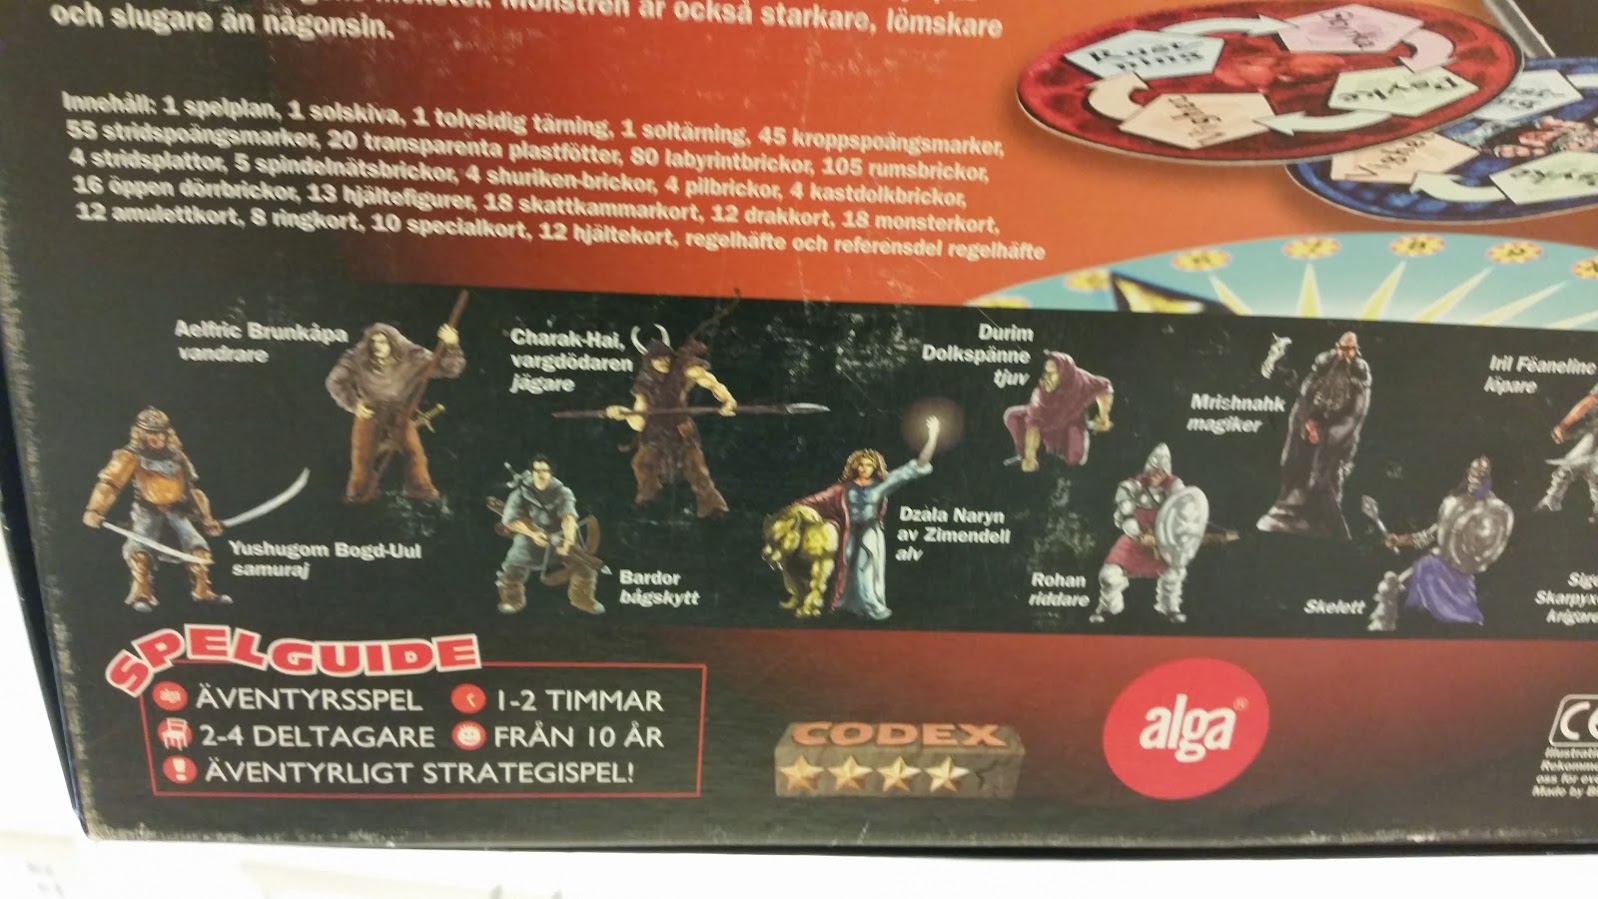
There are 12 different characters to choose from, all with different stats and abilities.

– KP / SP
These points represent the (KP) Maximum health and your (SP) Current health.

Playing the game

The game starts out with all players picking the characters they want to play, there’s a lot of variety and differences between the 12 characters. After picking your character you are also randomly assigned a Ring card if your character allows, The Ring card is kept secret until activated. The ring cards plays a big part in making the game a new experience every time its played.

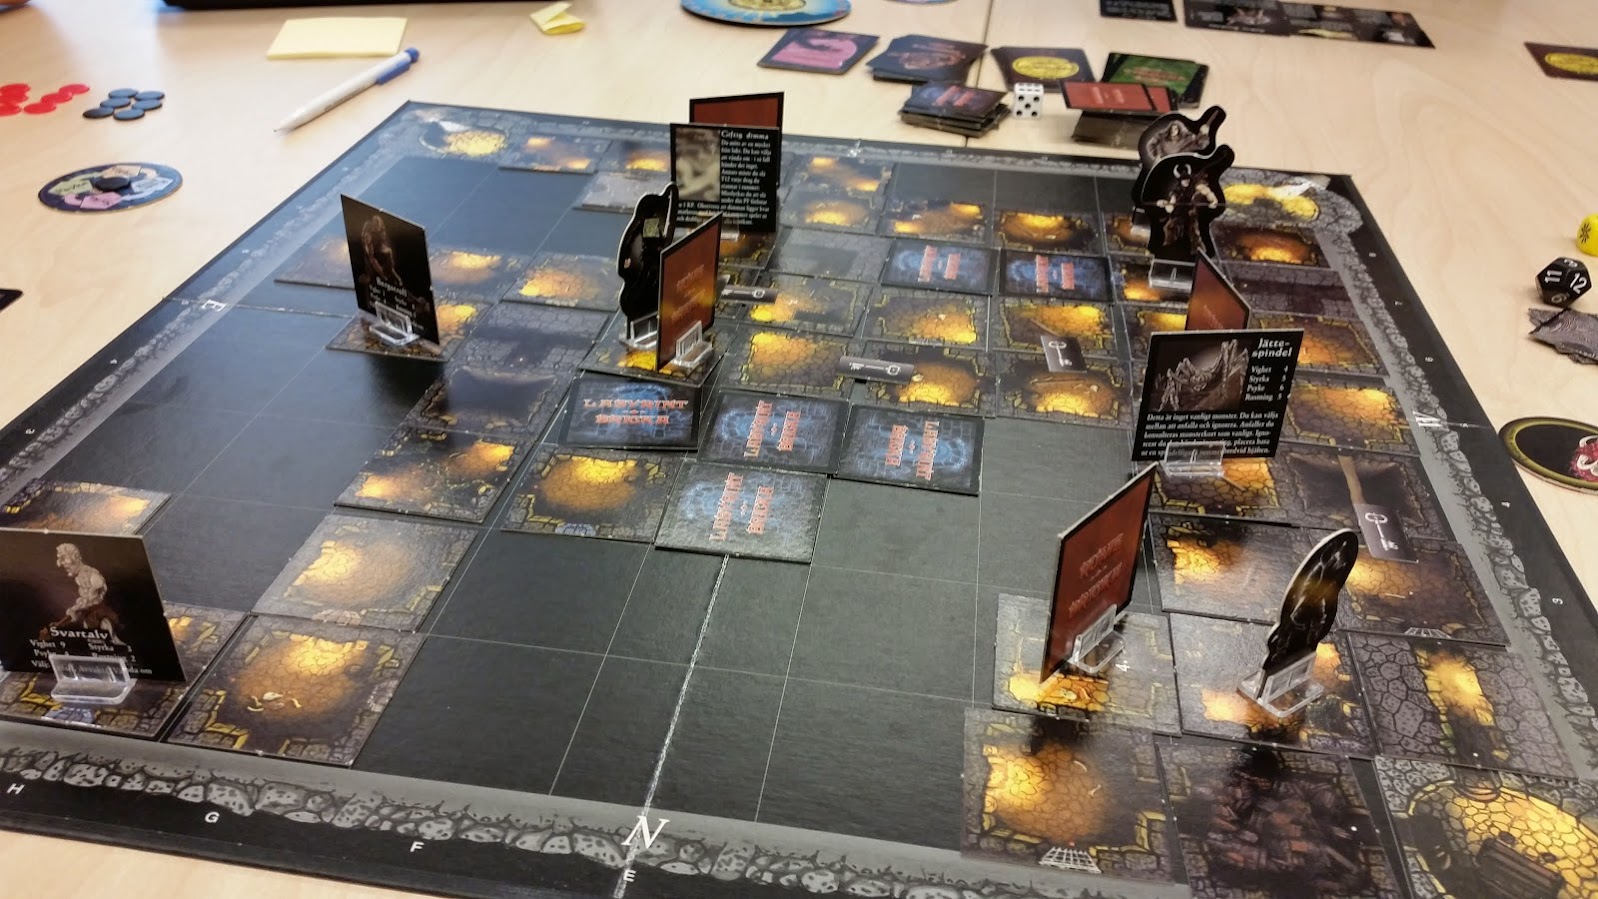
After the setup has been done the game can begin, Players take turns starting to explore rooms that are connected to the tile their character was standing on. When entering a new room the labyrinth tile gets reveal and placed with its marker towards the entrance point. This makes sure that the player does not get stuck while entering a room. If the labyrinth tile has the entrance point marked with a red the Room Tile also gets flipped, this is where the the more interesting parts of the game happens.

The first time we played Drakborgen we instantly stumbled upon how harsh and unforgiving this game can be, on the first turn of the first player we already had a death, thus a player had been eliminated from the game by running into a mighty Minotaur before we really got a chance to completely understand how the game worked.

Despite the early death of our first player, we were still not done playing after 3 hours, while on the box playtime was estimated to be between one to two hours. Getting the game time down to the two hours claimed on the box was not achieved until the third play session, and this was still pushing on the edge to go even longer.

After a few turns of exploring rooms players start moving towards the middle to challenge their fate with the sleeping dragon that has been randomly placed in the 9 x 9 inner grid of the board. While playing the game this was the outcome that occurred the most, everyone rushing towards the dragon room to acquire the valuable loot. After having acquired the loot we also noticed how it did not payoff as greed overcome the players and trapping them with the dragon waking up. Forcing them to drop the loot in order to flee. The one time we managed to finish a game without everyone dying the player who did not visit the dragon room actually won. This proves that the game isn’t necessarily about going for the big loot, having loot and being dead does no good. Having a small amount of loot while remaining alive is a winning concept. As the more players staying in the dragon room, the higher chance it is for the dragon to wake up, while in this specific room you get to draw a treasure card each turn, while as well having to draw a dragon card that might wake up the dragon. For each dragon card missing the chance of getting the 1 dragon wakes up in the pile increases. And if the dragon wakes up when it is not your turn, you will still be trapped with the newly awoken dragon.


Target group interpretation

On the box the target game is branded as an Adventurous Strategy Game. with a recommended age from 10 years. After having played the game three times, I don’t fully agree with it being strategic. There are some strategic elements but not enough to be branded as a strategy game in my opinion, there’s just so much left to chance. You never know whats waiting in the unexplored room next to you, thus making it hard to make a strategic move while exploring.

The from 10 years recommendation i think could be put up at least a few years, there is so much happening within this game and due to the variety i think the game could be really hard to learn and understand at an age of 10.


Summary

Drakborgen was unlike any board game that I’ve played before, it relies on strong random elements and you will need luck on your side in order to manage to win. I was disappointed of how they have changed the game from the original game from 1985. While not having played the original game I still got a feeling it would be so much better as in the parts where this game had its flaws, the original game seemed to have so much more different cards for each situation. I see this as an attempt to take a working game and then compress it to reduce the amount of different cards.

The game had some problematic mechanics that could make you get stuck for a very long time, it might be a good representation of being stuck in a dungeon, when playing however it became repetitive to just roll the dice every turn to see if the door or fence would open. At one time it occured that one of us who were playing tried opening the same fence for over 10 turn. To fence in this specific case, rolling 3 or below on a t12 was required, not just once but twice in a row. This added some frustration of not being able to do anything but roll and wait for next turn.

Having that said I still did enjoy playing Drakborgen but i wouldn’t go as far as recommending it for others to play unless playing with at least one who knows the rules, the learning curve for this game is just massive and hard to overcome.

Tagged with:
Posted in Board Game

New Project New Ideas!

Now that last course has come to its end and the game Tale of the Deep was completed with some minor bugs.

The next project has already started and the name of the new course is Theme Park. We are going to create an Arcade like game with an unique input system. or rather its prohibitet to use mouse and keyboards as input, unless they are modified to be used in a diffrent way than originally intended.

For this project I’m working in a new group and we are going to be using Unity rather than c++ as in previous projects. Out goal is to create a game with a typical arcade feeling (japanese arcade). As you are going to help a crocodile eat its food by physically moving its teeth around to match a preset pattern. Once this is done you will need to help the crocodile chew the food by manually close its mouth. Depending on food you might need to chew it more than once.Early

The Challenge of this project is the construction of the input device itself. Beside using the IPAC card where you can easily exchange fulfilled circuits for keyboard inputs. Eveything needs to fit together and work smoothly. And with the upper jaw of the crocodile comes problems. It is supposed to be a part of the input device. this causes it to become a risk. It will need to hold itself up and be movable for the chewing part of the game. Hopefully our plan of using the gas pistons from the trunk of a car to hold it up work. These are made to hold up arround 35 KG of weight (from the car we are taking them from).

The underjaw has its own difficulties as it will need to have mounts to hold the upper jaw in position. It also is going to have the base place holders for the 6 teeth the game will be using, these will be connected to the IPAC card and triggered when the teeth are placed. due to the IPAC supporting up to 56 inputs we can have multiple switches per tooth slot. giving the ability to make the game more advanced.

Inside the underjaw where the you would expect the tounge of the crocodile to be the game monitor will be placed lying down. this is in order to keep it all more together and yeah… you cant see the screen while you are chewing.

Hopefully this is going to be a brilliant game. but it will be a challange to put all the pieces together. as much of the way our inputs for the game is going to be built from scratch.

Tagged with:
Posted in Programming

Artifact : Energy

This time I’ve been working on the Energy artifact, or rather linking it together with previous artifacts such as the Slider bar and the GUI.  This is also not visible until you get to the second stage of the game where you grow up and acquire your fishing rod. Its only drawn with color in the second state where you actually have an energy bar. And as the describing color of the bar is white it will reveal itself as soon as the bar changes color in the background, quite simple but well thought out.

Gui

The Energy slider is actually being drawn in secret in first stage of the player fish, but is then always set to 100% and white, in order to cover up the transparent hole where the bar in the stage where you get the energy is. It also has a text in front of it with the same color, so having it being drawn behind nicely shows the text when changing the color of the bar upon finding the fishing rod. By doing this there is no need for changing the sprite of the GUI upon reaching the next stage of the game.

By using the previously used Slider, that is also used for Volume controls and the hunger bar. I added one to show the energy on a scale 0 – 100, each number being 1 % of the bars width. The energy also has power ups that you can find in the terrain.  These power ups modify how fast the energy is drawn, With each upgrade the drain is lowered.

These powerups made it abit more difficult to figure out how to balance the energy drain, while being a simple question on math, it turned out as a formula where the powerupcounter being 0-3 being multiplied with the energy. Looking like this :

m_Energy = m_Energy – (1 – (.3 * m_PowerupEnergyCounter ));

The GUI also shows the upgrade status by filling in 1/3 of each circle representing each upgrade.

Gui2

The Energy bar is placed in the GUI to give the player a visual representation of the current energy status. This lets the player know when the power is about to run out and the light will go dark. The energy itself is also there to prevent the player from always having the light on, and give the player the option of when to use it and when to turn it off. though draining the energy out completely will automaticly turn the light off, leaving the player in darkness.

Tagged with: ,
Posted in Programming

Artifact : Level with Layers

What?

The artifact of this week is the Level, or more specifically the Load function of the level. It is based on the platformer code with some small modifications around layers and colliders, creating possiblilities to choose if these should be active or not.

The Level is used for easily drawing out the game level from a txt file, and therefore allows you to work with the level inside an Excel document. This makes it much easier to create the level, rather than hard coding it directly in the code. It’s flexible and easy to change where you spawn as a player or where all the enemies spawn. And by using multiple Layers it becomes possible to create objects that you can walk behind, or swim behind in our game.

How?

The Levels is loaded in from a text file using and ifstream for reading the lines from the file. The first thing that the level will load in from the text file is what the name of the sprite sheet that it should load followed by how many sprite boxes and their sizes.

By loading in the number of sprite boxes that it will need to read in both positions and how much to draw out from that x y position. After having the number of done, moving on to the next part where it loads them in with their values from the text file with x y width and height and saving them in a map with a char and a struct containing x y width and height.

level


The level also contains a layer enum and a bool for collider.  The Enum is to keep track on in what order each of the layers should be drawn out, to make sure what can be drawn out infront of what, combined with the collider bool that will filter out if the layer should have colliders on its objects or not. these two in combination made it possible to make it so that a layer infront of another without collider, that the player could then move in behind.

Why?

The main reason for making the level load to be like this is to easily to craft the map. in Excel, where you can colour code each letter. This makes it much easier to get a clear overview of how the level looks compared to have look at a white text document and try to figure out where everything is located.

levellayout

Tagged with: ,
Posted in Programming

Artifact : SoundManager

What?
The soundmanager is an essential part of the game. and required to play both sound effect and music. It allows for in the code easily use the soundmanager and call its play function with the given path parameter. if such a sound has already been played it will simply play the sound. otherwise it will add the sound before playing it.  more details on this in the next section with how it was made.

How?

The SoundManager I’ve created is done by having two Structs, one for handling the sound effects while the other one handles the music tracks. The Music and Sound Struct differs a little bit, due to how SFML handles sound and music. The Sound Struct keeps tracks on the Path to the sound file, a sf::SoundBuffer that contains the sound and the sf::Sound itself. This is as the Sound actually stores the sound effect inside the buffer that was created. The Music Struct however does not have the buffer, so it contains the Path to the file and the sf::Music. This is because the way that SFML uses the music is that it Streams the data that should be played directly from the path. and never stores it.

These are then turned into vectors that i will call SoundBank and MusicBank

struct SoundsStruct
{
string path;
sf::Sound* soundData;
sf::SoundBuffer* buffer;
};
struct MusicStruct
{
string path;
sf::Music* soundHandle;
};

vector<SoundsStruct> m_SoundBank;
vector<MusicStruct> m_MusicBank;

PlaySound

By having these banks sorted, it will be easy to go through what sound has already been used before. by simply comparing the path with the vector. and when its not found. It will then go over to the AddSound or AddMusic part of the play function.  This is done with a new kind of for loop I just learned how to use, the syntax is shown in the picture above and it will go through every sound vector inside the soundbank. So it’s  a For loop and an Iterator at the same time. Turned out very handy in a situation like this.  addsoundss

Why?

By having this sound manager the sound effects will easily be stored and reused rather than loading them in every time they are called. It also makes using sound where you want to use it much easier. It now takes one line of code, well assuming the sound manager is already initialized where the you want the sound to occur. as it would just be as simple as this :

Soundmanager->PlaySound(“song.mp3”);

Very easy to use and fail safe friendly as it will automaticly add not loaded sounds already.

Tagged with:
Posted in Programming

Artifact : Parallax

Lets start with explaining a Parallax before moving into how its created.

 Parallax is a displacement or difference in the apparent position of an object viewed along two different lines of sight, and is measured by the angle or semi-angle of inclination between those two lines.Parallax – Wikipedia

As you can see in the picture the object overlap each other depending on what the cameras position in relation to the objects.
And now here is an overview on how my layers are. (Sorry for the blinking image, it does not look this way in the game itself)

77uss

So how is it that this kind of optical illusion can be created in a flat 2D game. The way that I create this effect is by sorting out the Game Level into different layers, at this moment I am using a grand total of 5 layers.

LOWESTBG

This layer is a fixed background, being the same size as the gamescreen itself, and will always move with the player.

SECONDLOWESTBG

This is where the Parallax starts to take effect this, starting out this layer also moves with the player, but not entirely. It has a formula that uses the player position in order to get this layer to move around 20 % of the player position on the X axis, while on the Y axis it is slowed down even further to 10% of the position.

HIGHESTBG        

After already having one layer of parallax, adding this second parallax layer gave it a even more deeper sense of the background actually. For the parallax illusion to work this layer needs to move in yet another diffrent speed. This layer is ontop of the previous layer, so it should be one step closer to the player, so its only fair that this layer moves fast than the previous layer. this being set to 30% on X and 15% on the Y axis.

MIDDLEGROUND

On this layer most of the game objects are located, such as the player, enemies, and walls. player movement is on this layer, so speed here is always 100% 

FOREGROUND

This layer does not yet actually do anything, but the idea is when something shall apear on the screen in from of the player. as its then closer to the camera, it should move faster than the player itself, so the speed would be above 100% on both X and Y axis.

So quick recap, In order to create a parallax in a 2D environment, you use multiple layers moving in different speeds.

When the parallax is in place in the game, and set to correct speeds in relation to the player, it will give a good depth in the game even though it is still just a flat 2D game it will give a completely different feel to it. Here is an example of the result of this artifact.

77ujr

Tagged with: ,
Posted in Programming

Artifact : Button

The artifact of the week is the Button!

What is the Button ?
The button consists of three stages. Being there, being hovered and being selected as shown below. It has a sprite sheet of three sprites.

button1

The button as it is in its original stage, nothing special it is just there and waiting for some action.

button2

The button being hovered, now things will start to happen, upon mouse entering the sprite of the button the sprite will change into the second sprite in its sprite sheet.
When the mouse leaves the button, it will go back to its normal state of not doing anything.

button3

The button being selected by the mouse being hovered inside the button and holding the mouse click down, Then the button load its third and final sprite from the sprite sheet. Upon leaving the button while the mouse is being held down it will go back to its original state. If the mouse is release while the mouse pointer still is within the button, it will cause the buttons function to trigger.

How was the Button made?
The button is created by two things an sf::Sprite and a sf::CircleShape. The circle is there as the button is round. it is not actually being drawn out. while the Sprite loads in the image as a square. The button sets both their position to the same, and if the position of the button is changed. both will follow. 


Then with the use of Pythagoras between the mouse pointer and the circles center the distance is measured in between. if the distance is less than the radius it means the mouse is within the circle and will then trigger the hovered effect. By not having the button to activate on the mouse down event, it will be possible to have the third sprite being shown, instead of just instantly in this case jumping into the next stage as its a start button.
buttonh

Why was the Button needed?
The button was needed in order to give the player some feedback that something happens when hovering and clicking the button instead of just being a sprite that instantly activate what the button does. This however makes the button feel more alive. It also opens up for using the button in new ways that are yet to be explored, after all the button now has three stages that could be set to do pretty much anything!

Tagged with: ,
Posted in Programming